I feel it's the right time for me to try making a game all by myself (except for the engine part). This blog is about sharing my processes and experiences as I walk along the garage developper route. Hopefully, this will end up with an actual game :
Invasion Aftermath, Mankind's Revenge!
During my last vacation, I spent some time in NYC with my girlfriend, before sailing south for some great cruise in the eastern Caribbean. I took the opportunity to take some shots of Manhattan with my Galaxy Note from the Empire State Building observatory, knowing this would be useful for creating cities concepts for my game.
BTW if you've never been there, you should. The view is spectacular, and the city is awesome.
Then during the trip I used my Note to do some over paints, some of which I'd like to share with your now. These are coming straight from Sketchbook mobile on the Note.
The main goal here was to try to find some color signature for the game. I searched for a specific color range for each of the three main components of my game:
The earth environment. Reflection of the desperation of the human race, crushed by the superior alien technology.
The Aliens. The color palette, the shapes and silhouette all have to reflect the use of non earth technologies.
The hero's biplane is a reflection of hope, and must be very different from the rest of the human items.
This one is my favorite. The aliens are aggressive and colorful, almost arrogant. They don't need to hide. They are a mixture of crustaceans and wasps, with their yellow stripes and dots and spiky silhouette. The background uses dimmed shades of orange, ocher and green. I think it reflects well the state of despair of the humans. The biplane is classic red and offers a good representation for hope.
The next one I find less interesting. I was trying to push further the background into ocher to give it a more distinctive look, but I think this is too much as it washes out any other color variation. I also tried to detail and cleanup the alien ship too much, and as such it doesn't leave enough space to imagination. The result is a little naive given the limited control one can have with the mobile tools, compared to say Photoshop.
This one I find also interesting. The background colors explore another palette, with more purples and oranges. I quite like it. The ship is quite interesting in its shape and has some velvet like quality to the surface. It has a good balance between organic and technology. I will try to push this further in upcoming researches. It's also a good candidate for experimenting with non traditional shaders for the ship's surface.
That's all for now. Your comments are always welcome.
I had a couple things to do in order to complete my second loop. Mainly introduce dynamic environment elements and finalize life and points management.
Here's a small video showing dynamic environment with basic blocking objects and points accounting at the end of a level. Nothing fancy, just functional stuff.
Third loop: Visual design
Now this is something I've been waiting for. At last I can now start working on the visual designs for the game. This is something that will take me quite some time, so don't expect too frequent updates in the following months. I've also got a large school project in the making (more on that later), and time is flying by way too fast to my liking :P
My goal at the end of this 3rd loop is to provide a vertical slice of the game, that it a representative sample of a near-final quality version of the game.
During this loop, I plan to go through these visual design stages:
Visual identity and color signature
Hero and hero items
Aliens
Environments
Fonts
HUD
Title
Galaxy note
This piece of technology is just amazing. I bought it precisely because of the included stylus with pressure support on applications such as Sketch Book Mobile from Autodesk. And I must say it rocks. I'm using it to sketch concepts for my project when I'm on the go and I've got some time to spare.
Here are a few concepts I've been doing on the Note for my game (note these my not be representative of the final designs):
Hope you had some great holidays. Besides working on Invasion Aftermath and AMA studios' project, I actually spent most of this summer working on my personal website. I've had the domain name reserved for years but never took the chance to work on it. Now it's up and running.
It's still work in progress, but it's coming along nicely. Hope you'll enjoy it.
Now a new academic year is about to start. New students, new classes, and the introduction of a 4th grade in videogames development. This is going to be fun...and a lot of work too !
Turrets
A small update on my game project.
First, there was some bugs in the mother ship animation triggering that is now fixed.
I've also implemented a first version of turrets. Turrets are interesting because they work on two separate axis, and you have to figure out the angle for rotating the base and the angle for rotating the canon separately.
Behavior
I wanted the turets to fire only when they are almost aligned with their target. The idea is they would want to 'save' amunition if they were not sure there's a chance to hit their target. That prevents continuous firing and gives more 'thinking' behind the turrets, it makes them less mechanical and more realistic.
I also added some jitter to the turrets when firing. This serves two purposes: One, it makes the firing a bit more cahotic and more realistic, and broadens a little the target range. Without that, chances to be hit are very low as the turret is always a little 'late' in targeting you (as it tries to allign with your position).
Finally, I wanted the canon vertical angle to be limited to the horizontal plane (no possibilities to shoot downward). I'm planning to have passages in some maps where you can sneak-in by flying below their shooting range.
I also did some anticipation tests. By looking at the current biplane direction, I could rotate the turret in a way that the projectile would reach the biplane if it didn't change its route. It proved to be way too precise and much difficult to play as you basically would be hit pretty much every time. So I removed it and kept it a little dumb.
Implementation
As always I've made a basic model that is not visually representative of the final design, but is functionnaly the same:
I made a long base so it can be decided during the construction of the level (remember levels are stored as xml files and built at run time from a library of objects in memory) at which height to place the turret, depending on terrain altitude.
When doing the implementation, the question was: Do I want my projectiles to have a linear trajectory or fall down with gravity?
I decided to implement gravity as it is interesting to see the impacts of the projectiles on the ground. To my opinion it makes the experience more solid. It also alows to realise there's a turret offscreen if projectiles are falling nearby.
However I find it quite difficult to see the altitude of projectile and determine in advance if you'll be hit or not. It's ok when theres only one or two turrets firing, but it's quite difficult if there are three or more.
I made some tests with many turrets and it's just a mess. It's fun to watch but hard to play. I guess I need to think more about ways to make all that more playable, this is still a bit rough.
It could be quite interesting in stereoscopic 3D though.
I did not have this really planned for this dev loop but I realized I could not go further into exploring new mechanics if the environment was not a little more representative of my vision for the final game. In other words, if your game play relies a lot on the environment, these cannot stay completely abstract forever.
So I decided I needed to build some new test environments, and figure out an efficient pipeline for creating natural-looking terrains.
I looked for terrain software (I didn't want to sculpt all by hand) and purchased a license of the excellent World Machine, a node-based software specialized in the generation of terrain. I love it because it does only one thing and it does it really well. No fancy renderer included or whatnot, just building nice terrain data, wonderful.
So, eager to test this new software, I put up a simple node graph to create an island and get instantly some great results:
Only that my environment is all made of tiles, so I needed to figure out a working pipeline within this constraint.
Unique terrain or tiles?
In Tiled (the level editor I'm using), you can import multiple tilesets, each with its own tile size. So potentially you can have one layer with a single gigantic tile (like a unique terrain) and on top of that have a tileset with actual tiles (like the buildings or whatever).
So the question came to my mind, should I pursue in the use of small tiles both for the terrain and for the elements on top of it, or should I create a unique terrain for each map, with tiles on top?
Creating a unique terrain is very tempting. First because visually it is unique, and thus can have recogniseable features and shapes and be truely beautiful, with no repetition whatsoever. Second, because it all can be generated procedurally, while still having the ability to control the local features thanks to World Machine's fabulous vector layout capabilities.
But the sheer size of a unique terrain (even if limited to an island) poses serious challenges, both in term of memory and performances. To reduce memory usage, the traditional method is to have a set of repeating textures that are blended over the terrain depending on various criterion such as height or slope. You can also use low resolution masks (such as erosion) to further enrich your texture blending composition.
The main issue with this approach is that it requires a significant amount of computation and texture fetching per pixel. For instance if your shader requires a normal map, an albedo texture, a specular intensity map, a specular gloss (roughness) map, even by combining some of those, you'll need 3 samplers. And that's only for one material. Say you want at least some grass, rock, sand and snow, you're good for 12 samplers. And that's not counting any mask nor any shadow samplers. You could easily reach the 16 samplers limit of model 3 pixel shaders (which some of my targets are bound to) and yet have a rather poor material library.
Add to that the cost of blending all these, and you can say goodbye to your 60 fps on any machine but the PC.
With tiles on the other hand, you have a unique material (or texture) for each tile with no need for complex shaders to compute or blend multiple textures.
Generating the tiles
Tiles are great in many ways. They offer a terrific compression ratio. With a relatively small library of tiles you are pretty much limitless with the size of your map, and with the right use they can become barely visible for the average Joe. However, working with tiles can be such a pain, especially when you have the additional constraint of allowing your tiles to rotate by 90 degrees (which I do). Add to that the increased complexity of a 3rd dimension and you really are in trouble.
Fortunately, World Machine has the ability to create file-based input nodes (as opposed to fractal or random noise only) which allows the user to somewhat direct the tool.
So my plan was to create a set of hand painted 2d tiles (64x64 pixels) in Photoshop that would be the input node for World Machine to start with:
Here you can see I determined a few altitudes and transition. Black is sea level, dark grey is ground level, middle grey is my highest flying level and light grey up to white is blocking. Some tiles are repeated and rotated for test purpose.
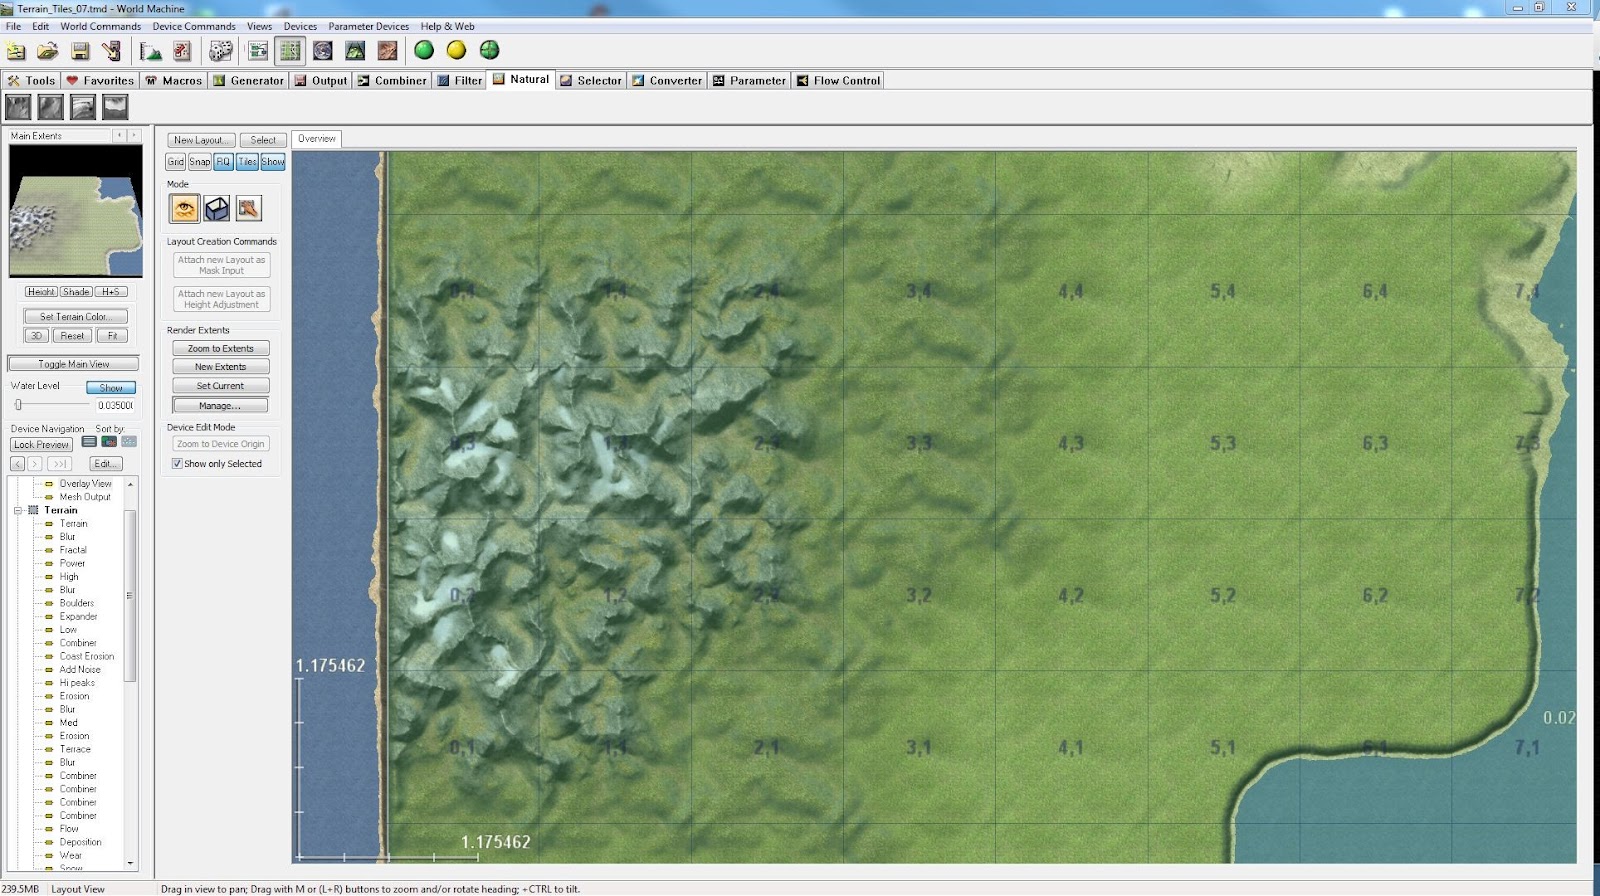
I then input this control texture in World Machine for further processing. You can see the full graph of my first terrain implementation that generates a height field and a color texture :
World Machine has the ability to subdivide its world into regions (or tiles as they call it, but these do not necessary mean they repeat seamlessly). The great deal about these regions is that it allows for perfect matching between your input tiles and your final output. Also WM allows you to render and output specific regions, and when batching multiple regions it uses all your CPU cores in parallel, yay.
In the above screenshot you can see the effect of the WM graph on my tileset.
You can also explore details in perspective with a real-time preview renderer:
I will need to improve my generation graph a lot for generating the final assets, but this will do for now.
Let's now have a look at the output data. For each meaningful region, I exported a color and height-map (16 bits) file.
Here's the highest mountains tile height-map in Photoshop:
The main problem here is that even if the base tileset was perfectly tiling, some of the processes that were added in WM broke that tiling. Such as erosion which has some random factor and can potentially leak on another tile. For that reason, I created a Photoshop script to 're-tile' the generated region.
Now I need to generate normals. These are critical for the lighting and need to be precisely computed. For that, I don't want to rely on a 2d process, so instead I import the height-map into Mudbox. The tileable feature is back in Mubbox 2013, so that's even better. This will also give me the opportunity to sculpt some specific feature or add some extra detail when I will be producing the final assets for the game.
I bake the normals in tangent space based on the ground plane (equivalent to world base in Z up):
I process it in Photoshop to prepare it for DXT5 compression by placing the X component into the green channel and the Y component into the alpha channel:
Geometry
Now it's time to talk about the geometry for the terrain. Some engine have the ability to store terrains into an elevation data and generate the geometry on the fly. This is great for memory compression as it only stores a scalar. On the other hand, it requires even sampling, so memory is wasted where it's oversampling low frequency data (i.e. flat or smooth areas).
FreshEngine only deals with meshes, which means storing a position vector for each vertex. Meshes however can be adaptatively simplified (offline decimation) to more closely follow the frequency pattern of the data. So all in all, I prefer this approach as it allows capturing very precise, high frequency details only where it is necessary.
WM can export .obj meshes directly. However it cannot decimate. Also my decimation needs to maintain edge borders in order to keep my edges perfectly tileable. I decided to do it in Maya which has all the necessary features.
First I create a mesh with enough resolution for my needs, and less resolution on the borders (as those will be untouched by the decimation):
Then I import my elevation data through Artisan:
Finally, I made a small script that in one clic decimates the internal faces while leaving intact the border edge:
Placing textures
In a traditional height map terrain, texture coordinates (UV) are implicit. That is they are based on the XZ position of the terrain sample. With regular mesh texture mapping, you need to explicitly store UVs for each vertex. Not only that but when doing tangent-space normal mapping you need a normal and at least a tangent for computing your tangent basis (depending on the need, you can compute the binormal on the fly or store it).
As my tiles have all a fixed size, I can create UVs on the fly in my shader, based on the local XZ vertex position, much like height map terrains. Furthermore, I don't need to store a normal and a tangent to create a tangent basis as it is invarient across the tile. I just have to read the direction vector from the mesh transformation matrix and rotate my normals accordingly. In short, all that is actually needed from the mesh vertices is the XYZ position.
Now let's instantiate this tile a few times and rotating them. A few cracks are still there and need to be fixed:
This can be fixed easily in Maya by snapping the points together:
Now I repeat the process for all the tiles. At this point I did not fix all the edges as it is quite time consuming and it's not worth it at this point since these are not the final assets.
The only thing left to do it to create a smaller version of the tiles to create a tileset that can be used in Tiled to create the level:
And now, time for testing. It is really surprising at first because I was already used to the two building heights I had in my previous tests, but here there are various heights so it is more difficult to read. My conclusion is that I need to enforce some readable altitudes by scaling some peaks to fixed heights in Mudbox.
So please don't mind the cracks between tiles, again this is temporary and will be removed once I produce the final assets.
Thank you for your patience reading this extremely long post ! Feel free to comment or ask any question.
Wow, time is passing by so quickly, and with the busy end of the year at the school plus the work at AMA, I realize it's been a while since my last post. So let's get going.
Waco
Something that I've not talked about in my previous posts is the fact that the main 'character' of the game is not going to be a little spaceship like the one used in the prototype version of the game so far. As I was creating the back-story for the game, I was looking for some strong image that would strike the imagination of the viewer and make the game instantaneously recognizable. Not to mention an alien spaceship used to defend humanity from alien invasion is just so 'Independance day'...
Part of the story is the idea that the aliens strike the earth using large EMPs, changing instantaneously any hi-tech human weaponry into a pile of useless garbage. That's how they win the war so quickly.
I won't spoil all the details of the back-story here and now, but basically our hero found and old biplane that is immune to the EMP effects and will use it against the invaders.
I thought having a low-tech biplane fighting Huber high-tech aliens would provide a strong visual identity for the game, something I think is utterly important.
I choose a 1935 Waco bi-plane as a model, because it's a cool and beautiful piece of antique engineering and I think it is representative of the iconic image everyone has in mind of those magnificent planes.
Also, it is a civil plane and not a WWI plane. This is on purpose and part of the back-story of the game.
This image is from internet and copyright its owner/author.
Cargo
Usually, a plane like this can hold a maximum of two passengers (front seats) + the pilot. However part of my gameplay requires to transport humans to save them from the aliens. Only being able to transport two humans at a time was going to be extremely boring, so I had to devise some way of allowing the player improving the cargo capability of the plane.
So I made this little concept that shows how the cargo capacity could be increased from 2 to 8 by collecting upgrade bonuses through the game.
The same idea will be used throughout the game with extra weapons and structural modifications made available to customize and improve the capabilities of the plane.
To implement this, I made the choice to increase cargo by steps of 2 extra seats. So 2, 4, 6 and 8 maximum. I then simply made 4 models of the plane, one for each capacity.
Clockwise from bottom-left: 2 (normal), 4, 6 and 8 capacity. Bear in mind these models are still mock-ups and not the final modeling/rendering quality. Also, I've yet to think about the game color scheme and what you see here might not be representative.
All upgrade models are exported in the same hierarchy and only revealed at run time when the player gets the upgrade. Same for the little humans in the plane (except the pilot who obviously always stays in).
You can see in the Maya screenshot all moving parts being setup using point ant orient constraints, and ready to be animated in the game. All constraints are exported as they are and evaluated in realtime in the game, so I only have to animate (procedurally) the constrainer and any constrainee will behave accordingly.
Finally, I improved a little the camera by adding an extra zoom behavior when landing on a platform. I think it will be useful when the final graphic assets are in place to see all the little details in the models. I thought it was nice without distracting from the gameplay.
As you can see from the video, the wings span of the biplane is much larger than the one of the prototype ship I was using. I didn't want to have a tiny biplane to fly. Also my humans would have looked ridiculous. Instead I went for a little oversized plane but I didn't increase the size of the collision volume in order to keep the control as fluid as it was. This sometimes makes the wings get into the environment, but it's gameplay first in that case I guess.
As always, feel free to comment.
Next: some terrain work for improving localisation and exploration
I'm now mid-through my second loop, which has a focus on mid term gameplay.
I first worked on implementing the 'save humans' mechanic. The basic idea is to collect humans a la Choplifter, then drop them to a safe place. Here's the 1982 original Apple II game for those of you too young to remember:
Now you can see that in Choplifter the helicopter has to land on the ground to collect the humans, a control mechanic that I don't have in my game (and I don't want to have). Remember my 'ship' only flies at two altitudes and is never able to actually land on the ground.
In Jesse Schell's excellent book 'The art of game design', I remember an interesting point about the advantages of designing a mechanic that can be reused in various contexts. It gives the player confidence and provides a sense of satisfaction because using a control he already knows he can explore new possibilities without new things to learn. It also relates to the amplification factor of the action as the player only have to learn to use a particular action once, but then the multiple possible reactions (or effects) depend on the context and amplify the control possibilities.
To comply with this idea of reusing existing mechanics, I decided to use the same 'slow-down to a stop' mechanic I developed for the fuel tank. This mechanic works at the lower altitude. As the little humans obviously should be on the ground, this altitude difference problem needs to be addressed.
The solution I developed is simply to have platforms on which the ship can stop, and having the little humans running toward the platform while the ship is waiting.
So I first made a generic human model with as few polygons as possible, yet enough for skinning animation to be implemented later:
There came the problem of scale. Should the humans be at a realistic scale given my building scale? Or should they be scaled up in order to better identify with them? I kinda did a compromise here, I made them small enough to integrate with the environment, yet large enough to read their features. I do think it works but I can change my mind later when designing final assets.
I then made the platforms. The one for collecting humans (blue), and the ones for unloading them (green).
Note the blue one having a solid collision mesh attached for the aliens to collide with it. The spheres are the triggers.
I think the player will easily relate to the fact that when a human disappears below the platform, he is being lifted to the cargo. I've added some stats to the HUD to help.
Of course the graphic design will have to be made in order to convey the function of the platform. But I could say that for all the gameplay assets of the game anyways.
Portals
As seen in the above screenshot, I've added portals to the gameplay elements. The idea is quite simple, you're given an objective at the beginning of a level, when this objective is fulfilled, the portal opens and you can move to the next level. It doesn't mean you have to do so however, you can continue collecting extra items or points until you decide to leave. That's basically the way I designed the success and failure condition within the scope of a level in order to create a first version of the Story Mode.
Again, I've made it all data driven, so here's a screen of a level with the new items added:
I've made it so you can associate as many humans to a platform by simply placing those humans in its vicinity. They will automatically run toward the closest platform. The percentage of accomplishment is automatically computed depending on the number of humans in a level.
Finally, the sequence of levels for the story mode and the objective to reach is simply defined in a lua table.
Enough talk, let's see how it plays:
A lot needs to be tuned but you get the idea. Now I need to work on designing some actual levels and objectives and see how that works. Next I'll have to work again on enemies behavior (which are a little rough right now) and add more variety to both enemies and items.
Oh and did I talk about exploration yet? I think this will play a large part in my game, but for that I'll need some actual graphic assets so all stuff doesn't look the same...
Hope you enjoyed this post, and as always feel free to comment.
Today, a post that has nothing to do with my game project.
Untapped potential
This small Jeep project is an exercise that I give to my second grade students @ HEAJ (Video Games Group).
The project makes use of various techniques in order to achieve the best possible rendering of a CJ-7 Jeep on the PSP using FreshEngine. A second exercise will come later where this jeep is placed inside a small game level designed and created for this purpose.
In a way, I think exercises like these also demonstrate how there is always untapped potential in a platform. That unfortunately is a reality of gaming hardware, they become obsolete before being pushed to their limit.
Actually, I think there's no limit but the imagination. Look at some of the latest C64 demos (from Booze Design for instance) and how new creative techniques can make this 30 years old machine do things that we though would never be possible.
So enough talk, here's a small video of the result of my small PSP Jeep project:
Making the PSP Jeep
One of the constraint was to make it fully functional for later use in an actual map. So movable parts had to be setup correctly and animation-ready.
Also I asked for the engine to be modeled so that if we crash the jeep into an obstacle, the hood could be opened and the engine revealed. The bottom of the jeep also had to be rendered realistically. All had to be done within a 4500 triangle budget with as few UV splits as possible.
On PSP, achieving nice environment reflections for the car paint and mirrors is challenging. One of the reason being that there is no real reflection mapping available in the hardware gpu. Instead it is capable of computing UV coordinates based on the result of lighting computations (shade mapping). So playing with bended normals and attaching shading lights to the camera can do the trick.
With this exercise, I explain to the students how to use multiple pass texturing with a custom blending equation to combine the environment texture with the color texture using the alpha channel of the same texture as a reflection mask:
Textures
The constraints for the two textures were as follow:
64x64 texels texture for environment, 512x512 texels texture for Jeep with alpha channel used as reflectivity mask for envmap. Both textures quantized to 8bits/texel.
I could have ask to split the jeep into color matching parts and assign each part to a 4 bits texture (16 colors) for the most aggressive optimization, but I thought it would be too much for them to handle. So I went for a single atlas texture with all the parts together and 8 bit quantization (256 colors). That's more in line with current texture compression techniques (like DXT1) where there is no global color constraint and you usually go for a single atlas. I might split and optimize my texture at some point to get the most out of the bandwidth and cache hits.
Anyways, here's what was asked:
Env map (here zoomed 2x):
Texture color channel:
Texture alpha channel:
Of course all has to be rendered @ 60 frames per second. Again, YouTube doesn't do justice to the smoothness of the animation. Also, it has been grabbed in interlaced mode because my grabbing hardware doesn't support 480p, so the actual quality is much higher than the one in the video.
I added some full-screen AA and bloom to make it shine. There's a fixed cost for these effects and the jeep in itself doesn't cost as much as what can be seen in the video (rather around 5 ms in close-up). Thus AA and bloom cost won't be added twice when I'll place the jeep in the level. I've got plenty of headroom for a nice environment @ 60 FPS.
Right now the animation is procedural. At some point, I'd like to set it up with dynamics so I can drive inside the map. That'll be for later if I can spend some time on it.